
DTF transfers, or Direct to Film transfers, represent a revolutionary technique in the world of textile printing that allows for the creation of stunning, high-quality designs with ease. This innovative method enables artists and crafters to print vibrant images and patterns directly onto various fabrics, making it ideal for custom apparel, personalized gifts, and more. In this guide, we will explore how to use DTF transfers effectively, uncover essential DTF printing techniques, and offer design tips for those new to this exciting medium. Whether you’re an experienced designer or just starting out, our DTF transfer tutorial will equip you with the knowledge you need to achieve impressive results. With the right approach and the best fabrics for DTF transfers, your creative possibilities are virtually endless!
Direct to Film printing, often referred to as DTF printing, has emerged as a popular choice among fabric enthusiasts seeking to elevate their design game. This unique method employs a film transfer process that showcases exquisite detail and brilliant color saturation on textiles. Throughout this guide, we will not only delve into how to utilize DTF transfers, but also examine alternative terms and techniques associated with this art form. From effective design strategies to selecting the perfect materials, our comprehensive overview will arm you with all the insights necessary to navigate the world of DTF and achieve magnificent results.
Discovering the Benefits of DTF Transfers
DTF transfers offer an array of benefits that make them a favorite among fabric printing enthusiasts. The primary advantage is their versatility, allowing for use on various fabric types, including cotton, polyester, and blends. This flexibility enables creators to experiment with diverse styles and applications, whether they’re producing custom apparel, personalized gifts, or branding merchandise. Additionally, DTF transfers are known for their vibrant colors and excellent durability, ensuring that designs maintain their visual appeal over time, while also resisting wear and tear.
Another significant benefit of DTF transfers is the ease of use in comparison to traditional printing methods. Unlike screen printing that requires extensive setup or vinyl cutting that can be tedious, DTF printing offers a streamlined process, significantly reducing production time. Moreover, with DTF technology, intricate designs including gradations and detailed imagery are easily achievable, making it an ideal choice for those seeking to create high-quality visual products. The simplicity of this method empowers both hobbyists and small businesses to bring their creative visions to life.
Getting Started with DTF Printing Techniques
To get started with DTF printing techniques, it’s essential to gather the appropriate materials and equipment. This typically includes a DTF printer equipped with water-based inks, transfer film, and DTF adhesive powder. Once you have your setup ready, familiarize yourself with the software tools necessary for design creation. Programs like Adobe Illustrator or CorelDRAW are ideal for crafting unique designs that are ready for print. It’s crucial to ensure your artwork is of high resolution to achieve the best quality when transferring your designs onto fabrics.
Beyond the technical aspect, understanding how to utilize different DTF printing techniques can drastically improve your results. Techniques like mirroring your design before printing, or the proper curing of adhesive, play a vital role in ensuring that the transfer adheres correctly and retains its quality over time. Additionally, experimenting with various fabrics can provide insights into how different materials react to DTF transfers, helping you pinpoint the best fabric choices for your projects.
Essential Design Tips for Crafting DTF Transfers
Crafting designs for DTF transfers requires careful consideration to ensure that the final product meets your expectations. One essential design tip is to prioritize bold colors and simple graphics, as these yield better results during the transfer process. When designing, always opt for high-resolution images of at least 300 DPI, which will help maintain clarity and prevent pixelation when printed. Additionally, consider the size of your design in relation to the fabric; larger designs may lose detail, while smaller prints may not be as eye-catching.
Another important tip is to think about the contrast between your design and the color of the fabric it will be applied to. For instance, bright designs on dark fabrics or vice-versa can create an eye-catching effect. It’s also beneficial to conduct test prints prior to executing the final transfer, as this allows you to gauge how well the colors and details translate onto the chosen fabric. Through thoughtful design choices and preparations, your DTF transfers will achieve stunning visual impacts.
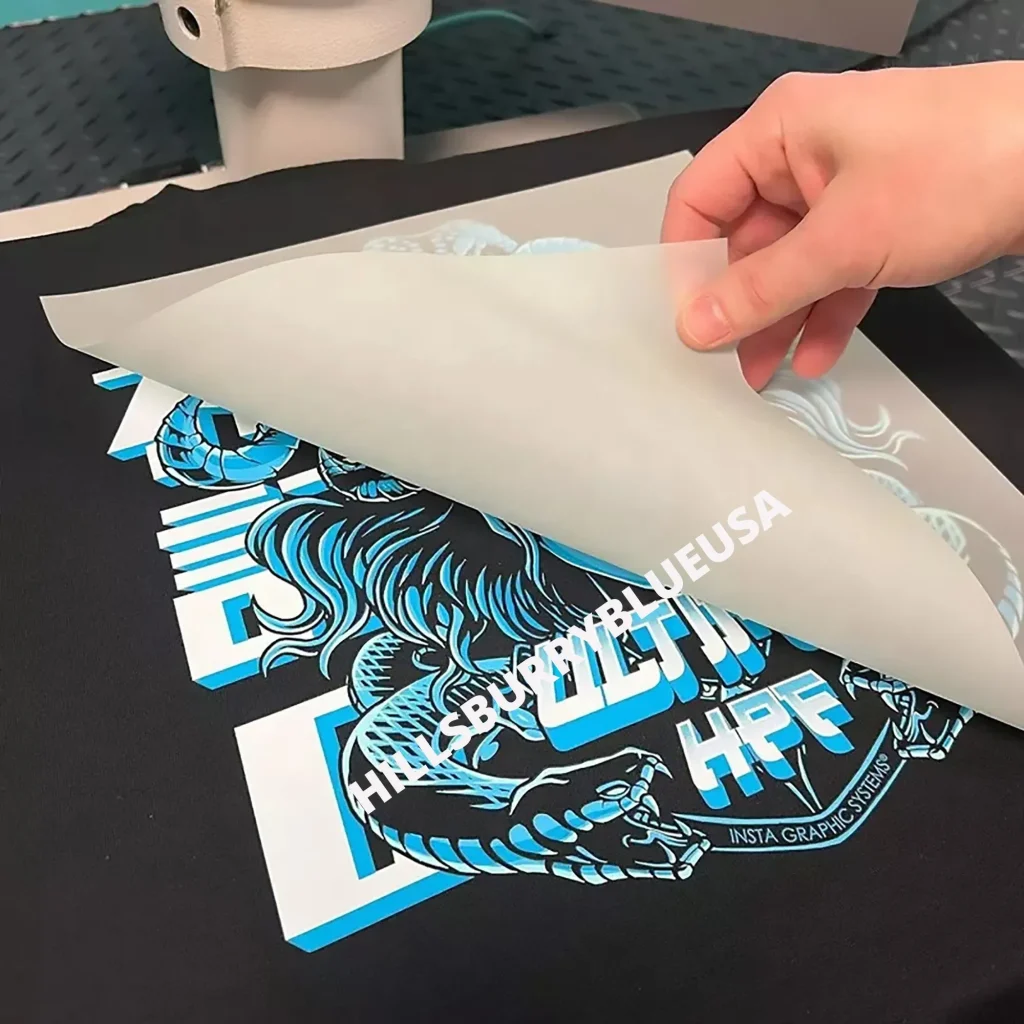
A Comprehensive DTF Transfer Tutorial for Beginners
In this comprehensive DTF transfer tutorial, we’ll guide you through the essential steps from design creation to the final application. Start by designing your artwork in a graphic design program, ensuring it’s high-quality and fits the specifications for DTF printing. After designing, you’ll proceed to print using a DTF printer, making sure to mirror your image for accurate transfer. Don’t forget to test your prints on scrap fabric to ensure everything looks perfect before moving on to the adhesive application.
The next step is critical: applying the DTF adhesive. While the ink is still moist, evenly distribute the adhesive powder on your printed design. Curing the transferred adhesive using a heat press is another crucial step, as this ensures a strong bond between your design and the fabric. Finally, after the transfer process is completed, peeling away the film should be handled delicately to preserve details, followed by a final heat press session to secure everything in place. This streamlined tutorial will empower beginners to confidently navigate the world of DTF transfers.
Choosing the Best Fabrics for DTF Transfers
Selecting the right fabric for DTF transfers is essential for achieving optimal results. Ideal fabric choices include cotton and polyester blends, as these materials have shown excellent adhesion and vibrant color retention when using DTF techniques. Cotton is particularly favored for its softness and comfort, making it ideal for apparel, while polyester fabrics often yield more vivid prints due to their synthetic nature. Experimenting with various fabric types can help confirm which yields the best results for your specific designs and intended use.
It’s also worth noting that the fabric’s weave can impact the overall finish of your DTF transfer. Fabrics with a smooth surface aid in achieving a clean and professional look, while textured materials may present challenges in adhesion. Pre-washing your fabrics before printing can help remove any residues or finishes that might interfere with the transfer process. By carefully selecting your fabrics and understanding their characteristics, you can enhance the quality of your DTF transfers.
Calibrating Colors for Perfect DTF Transfers
Color calibration is a critical aspect of the DTF transfer process, ensuring that the printed colors match your original design. Many factors affect color output, including the printer’s settings, the type of ink used, and the characteristics of the fabric itself. To achieve perfect results, it’s advisable to run sample prints on your chosen fabric and adjust the printer settings accordingly until color accuracy is achieved. Maintaining consistent lighting when assessing prints can also help in judging colors correctly.
Moreover, utilizing color profiles appropriate for DTF printing can mitigate discrepancies between screen and print. These profiles help align the colors being printed with what you expect to see, bridging the gap between digital design and physical output. By adopting diligent calibration practices, you’ll ensure that the colors in your DTF transfers are consistent and true to your initial design, ultimately elevating the quality of your finished products.
Frequently Asked Questions
How to use DTF transfers effectively for fabric printing?
To use DTF transfers effectively, start by creating a high-resolution design using graphic design software like Adobe Illustrator. Once printed on a DTF printer, sprinkle adhesive powder over the wet ink, cure it with heat, and finally, transfer it onto your chosen fabric. Following these steps ensures vibrant and durable prints.
What are the best fabrics for DTF transfers?
The best fabrics for DTF transfers include cotton and polyester blends, as they allow for optimal adhesion and durability. Always test fabric types to find the perfect match for your designs to achieve the best results.
What design tips for DTF transfers can enhance results?
For better results with DTF transfers, keep designs bold and simple. Use high-resolution images (at least 300 DPI) and vibrant colors that are easy to reproduce. Ensure proper layout and consider the intricacies of your design for a flawless transfer.
Can you provide a DTF transfer tutorial for beginners?
Certainly! A beginner-friendly DTF transfer tutorial involves these steps: 1) Create a high-quality design, 2) Print using a DTF printer, 3) Apply adhesive powder, 4) Cure the adhesive with heat, 5) Transfer onto fabric using heat press, and 6) Carefully peel off the film. These steps guide you to successful DTF printing.
What DTF printing techniques should I know before starting?
Before starting with DTF printing, familiarize yourself with techniques such as mirroring your design before printing, selecting appropriate curing temperatures (320°F-350°F), and ensuring even adhesive application to avoid design flaws during the transfer process.
How can I troubleshoot common issues with DTF transfers?
Common issues with DTF transfers can be resolved by ensuring high-quality prints and even adhesive application. If designs don’t stick, double-check temperature settings during curing and verify the fabric type. Testing sample prints beforehand reduces the risk of problems.
| Step | Description | Key Tips |
|---|---|---|
| Step 1: Design Creation | Create unique designs using graphic design software like Adobe Illustrator or CorelDRAW. Ensure they are high resolution (300 DPI) for optimal print quality. | Utilize bold colors and simple graphics for better results. |
| Step 2: Printing the Design | Print your design using a DTF printer with water-based inks. Mirror your design before printing. | Run test prints to check color accuracy before the final print. |
| Step 3: Applying Adhesive | Sprinkle DTF adhesive powder evenly over the wet ink and shake off excess to prevent clumping. | Even application of adhesive is crucial for successful transfer. |
| Step 4: Curing the Transfer | Cure the adhesive using a heat press or other methods, ensuring the right temperature (320°F to 350°F). | Monitor adhesive specifications for best results. |
| Step 5: Heat Transfer to Fabric | Cut the design closely and position it on fabric. Press for 10-15 seconds with sufficient pressure. | Use parchment paper for protection during transfer. |
| Step 6: Peeling and Finishing | Peel the transfer film carefully after cooling. Consider a second heat press for durability. | Allow the design to cool to maintain detail. |
Summary
DTF transfers offer a revolutionary approach to fabric design, enabling creators to produce stunning and durable prints with ease. This method, which utilizes a unique film printing process, allows for vibrant colors and intricate details on a variety of materials. By following this guide, you’ll be empowered to bring your creative visions to life, whether it’s for personal projects or a budding business. The steps, from design creation to final heat transfer, ensure that you master the art of DTF transfers, enhancing your fabric projects significantly.

